--NOTE-- Configure the remote reader first! And then, configure ID badges
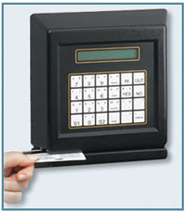
For simplicity, we recommend that you have the Remote Terminal placed near the computer where you will be setting up the swipe cards. The Remote Terminal must be on and connected to your network.
1. In TimeClock, click Settings > Global Settings > Time Clock > TimeClock. Place a check mark in the Allow manual swipe card entry option and the Enable Swipe Card Usage option. Click Save > OK.
2. Close out of the program and re-open TimeClock. This allows the changes in the last step to take effect.
3. From the desktop, click on Start > All Programs > Gradience > TimeClock Remote and enter the login & password.
4. Click File > New Terminal. Initially it will indicate Terminal Not Connected.
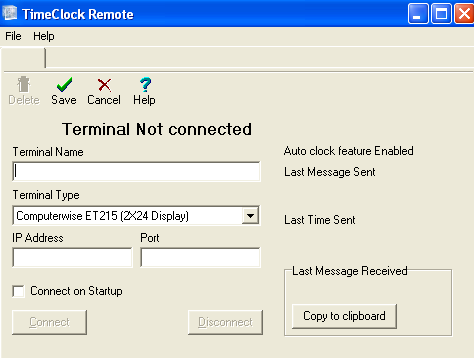
5. Make appropriate entries and click Save > Connect.
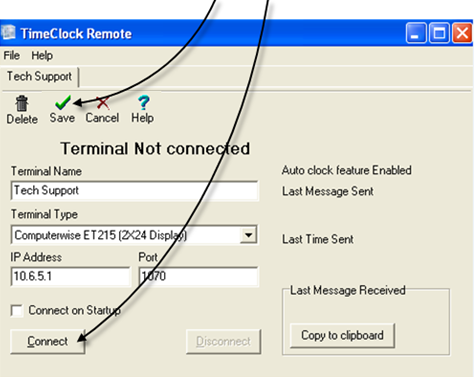
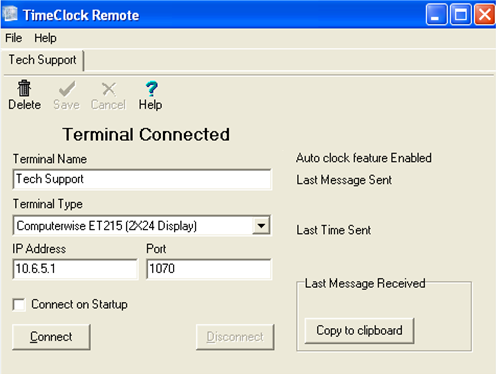
It should indicate Terminal Connecting and then, Terminal Connected.
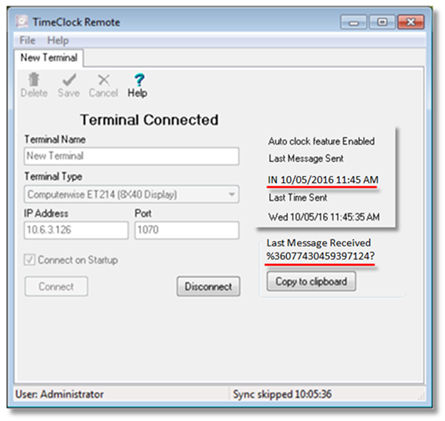
6. Swipe the card through the reader and then, within the TC Remote program on the computer screen and look for two particular things:
- An entry indicating the IN punch along with the date & time (See first red underline below)
- An entry under Last Message Received as shown below. (See second red underline below)
If the entry under Last Message Sent reads Invalid Login/swipe, as shown below:
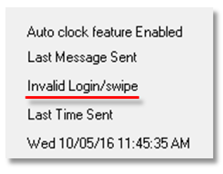
You may open Gradience TimeClock and click Settings > Global Settings > TimeClock and uncheck Require Password when Swiping:
Then click Save, close out of Global Settings. And reconfigure your Remote Timeclock. Visit this page to know more about the Invalid Login/Swipe issue. If you still see Invalid Login/swipe:
Disregard it and move on.
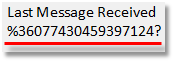
The entry under Last Message Received should start with a percentage sign followed by a series of numbers and then ending with a question mark as shown here:
7. Make a screenshot of what appears under Last Message Received or jot it down.
8. Click Copy to Clipboard. Then minimize the TC Remote program and open Gradience TimeClock.
9. Click Settings > Global Settings > Time Clock. Place a check mark in the Enable Swipe Card Usage option and the Allow manual swipe card entry option. Click Save > OK.
10. Click TimeClock Access and select the proper employee. Right-click in the field under Swipe Card ID and click Paste and compare what appears with what appeared earlier under Last Message Received in TimeClock Remote.

11. Verify that all of the characters are correct. When satisfied, click Save.
--NOTE-- If you are unable to get the cursor to appear in the Swipe Card ID field when right-clicking, please create a login and a password [whether you actually need one or not].
This will cause the Save checkmark at the top of the screen to go from grey to green.

Don't click Save yet! Now, you will be able to right-click in the Swipe Card ID field so that you may paste what was copied to the clipboard in step 8 above. Once it has been pasted, click Save.
--IMPORTANT!-- You must wait 30 seconds before testing the swipe card.
12. Test the swipe card by swiping the card through the Remote Swipe Card Reader.
13. Click TimeClock Entries and ensure that today's date is included in the date range to verify that the swipe you just did was registered as a punch for this employee.
--NOTE-- It should [not] have been necessary to close out and reopen Time Clock for the card assignment to take effect but if the test failed to produce a punch for the employee, please close and reopen the software t see whether the punch appears and if not, test the card once more.
Multiple Swipe Card Setup:
1. From the desktop, click on Start > All Programs > Gradience > TimeClock Remote > enter login & password.
2. Click File > New Terminal. Initially it will indicate Terminal Not Connected. Make appropriate entries, click Save > Connect. It should indicate Terminal Connecting and then, Terminal Connected.
3. Swipe the first card through the reader and then, within the TC Remote program on the computer click Copy to Clipboard, minimize the TC Remote program and open WordPad.
4. Right-click within WordPad and choose Paste. After the number appears, press your Enter key on your keyboard to put the cursor on the next line. Minimize WordPad and maximize the TC Remote program.
5. Swipe the next card through the reader and then, within the TC Remote program on the computer click Copy to Clipboard, minimize the TC Remote program, maximize WordPad and Paste the second number. If you plan to setup more swipe cards press your Enter key on your keyboard again to put the cursor on the next line.
6. Repeat this process for each card one at a time: Swipe > Copy to Clipboard > Paste into WordPad > press Enter. You’re now ready for the next card. Once all of the cards are pasted into WordPad, click Save and leave the file open.
7. Right-click on the first number listed in WordPad and chooses Copy.
8. Open TimeClock and click Settings > Global Settings. Place a check mark in the “Allow manual swipe card entry” block and the Enable Swipe Card Usage block. Now close out and re-open TimeClock. This allows the changes in the last step to take effect.
9. Click TimeClock Access and select the first employee. Right-click in the field under Swipe Card ID and choose Paste. Click Save and go back into WordPad, Copy the next number and return to TimeClock and repeat this step.
10. Once all the numbers have been pasted into TimeClock close out and reopen Time Clock. This allows the changes in the last step to take effect.
Using the Swipe Card Reader:
Below you will see examples of what the device would display when an employee swipes In or Out:
Bob Smith
IN 10/12/17 3:06 PM
Bob Smith
OUT 10/12/17 3:06 PM
If you see something like this instead:

You should open Gradience TimeClock, Select TimeClock Entries and then select the name of the employee who just swiped. On the right side of the screen, select Today to see whether the punch was recognized by the software. If so, you can be assured that as long as the reader displays those numeric digits with the percentage sign and the question mark on the ends, the employee can be confident that the swipe was successful.
All of the numeric digits with the percentage sign and the question mark serving as bookends is a representation of the code being read off of the magstripe. What is odd here is that the screen on the reader is displaying [literally] what is being read rather than the IN/OUT and the employee name associated with that code.
Comments
Article is closed for comments.