--NOTE-- This article is meant for users new to Gradience. It will cover the process of creating a Time-Off plan that earns accruals via Custom Dates and explain each option on its function. If you already know the purpose of this article but want a refresher on how to edit/add new custom dates via Auto-Fill or Manually, visit those linked pages.
Earning Time-Off by Custom Date:
WATCH our video about this topic.
Allow your employees to earn Time-Off on Custom Dates such as:
-
Every week (the same day of the week for everyone)
- Every two weeks
-
On the Last day of the Month
-
15th and the Last day of the Month
-
Quarterly, etc.
Click Settings, Time-Off Plans and then do the following:
1. Click on Settings > Time-Off Plans > New and click No to the wizard prompt.
2. Plan Name: Enter the plan name.
3. Time-Off Based On: select one of the following:
-
Length of Employment - Amount based on length of employment.
-
Hours Worked - Amount based on number of hours worked. See below: Accrue by Hours Worked
4. Each new year starts on: select one of the following:
-
Employee Anniversary
-
January 1st
-
Fiscal Date set at Global Settings > Attendance
5. Select How Often to Accrue: select Custom and then click the Edit Custom Dates button.
You may get this popup window shown here.
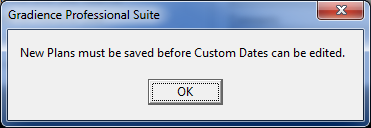
If you get this popup, click OK, then set the frequency to Yearly - Once per year and then go ahead and save the plan even though it is not correct.
6. Now you can click Custom > Edit Custom Dates. The Custom Dates Entry popup window will open.
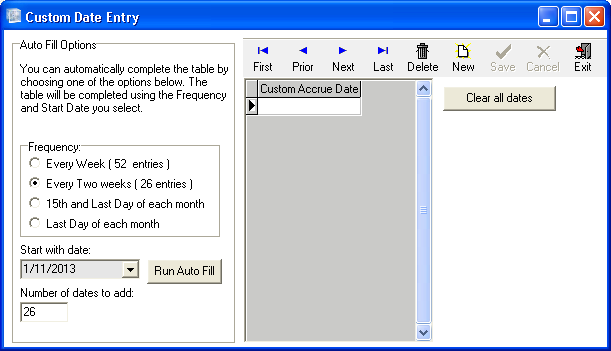
7. Frequency: Note: Every Two Weeks (26 Entries) is an anticipated selection. It [does not] reflect a previous selection. Select the one that’s right for you.
- If none of them work for you. disregard all of them and don't worry about whichever one is selected. You can then enter the first date you need in the central, vertical field and then press your tab key on your keyboard to enter the next date. When finished, click Save > Exit > Save > Close and move on to the instructions under To Carry or not to Carry below.
- If one of the choices does work for you, select it and move on to step 8.
8. Start with Date: Enter your first custom accrual date.
9. Number of dates to add: Enter the number of custom accrual dates that will carry you through the end of your [license]. Be sure to include the first date (Start with Date) in this number.
10.Run Auto Fill: Click this button to cause the dates to appear in the central window.
11.Click Save and Exit. The popup window will close so you’ll have to click Save again to save the plan as a whole.
--NOTE-- You’ve just entered a finite number of accrual dates. When they are exhausted, you will have to enter more. Typically, you should enter more dates as soon as you enter the new product key for the new license each year rather than waiting until you run out of Custom Dates.
To Carry or Not to Carry:
1. Select what to do with the prior year balance: (set to carry over or not). The software will Carry-over or Zero the balance at midnight at the end of each year, which will be one of the following…
-
Midnight before each employee’s anniversary.
-
Midnight December 31st.
-
Midnight before the new Fiscal Year begins.
2. Allow partial earnings for partial months / years worked: This will be grayed-out because it does not apply when Accruing Time-Off on Custom Dates.
![]()
3. You may click the Test Plan button if you wish but a better way is to skip this button for now. Later you can assign it to your employees and then run (and post) your accruals. You can always remove accruals after they have been posted.
![]()
4. Time earned in: Select how time is to be earned. It is usually easier if your plans earn Time Off by an increment that matches the way your Time-Off is [displayed] whether as Hours or as Days. This is not required but it usually makes using the software simpler.
![]()
5. Earning Levels Start on Benefit Year: Disregard this.
![]()
6. Max Annual Bank: Disregard this.
![]()
7. Earning Levels (Tab to create new level) - The levels represent time periods during which employees earn increasingly higher amounts of Time-Off over the years.
Each column will be explained individually. At the end, an example will be given.


8. From Month is the point when a level of earnings begins. Month zero is the employee Hire Date.
--NOTE-- Each new level begins where the previous level ended. There can be no [ GAP ].

9. Up to but not including month refers to the point where the current earning level ends. The important words in this heading are... [ but not including ]. The month number you enter under this, is the point up to which a certain amount of Time-Off is earned. Up to - not Through.

10. Hours Earned on each Custom Date in this plan This is the limit to what can be earned automatically via the plan for each Custom Date while the employee is on that level. Our example indicates Hours but yours could be Days. Also, this only limits what the plan will do automatically. It does not prevent you from giving an employee more time-Off via the Initial Deposit or via a Positive Adjustment on the Transactions screen.

Moving on:
![]()
11. This limits the amount of a particular kind of Time-Off an employee with this plan may earn in one year from all three sources available. As shown above the additional two sourced are...
- The Initial Deposit entered on the Time-Off Assignments screen.
- A Positive Adjustment entered on the Transactions screen.
If you enter an amount in this column that matches the amount the plan alone will accrue to employees, you will not be able to enter additional Time-Off as an Initial Deposit for this year or as a Positive Adjustment for this year.
If you enter a zero in this column, you are saying there is no limit to what an employee may earn in a given year. The employees will still only earn what the plan causes them to earn but a zero in this column frees you up to manually add more time-Off later if you wish as an Initial Deposit or as a Positive Adjustment.
Examples of why you may want the freedom to adjust the balance up beyond what the plan alone will accrue to someone:
- An employee wins a company contest.
- An employee performs an act of heroism or community service.
- An employee needs to roll Time-Off over from one Time-Off Bank to another.
- You discover that it is simpler to manually adjust the balance up than to reaccrue from some point in the past.
![]()
This is where you establish the maximum amount that employees may carry over from year to year. This amount may change from level to level or it may stay constant.
Earlier, you would have made a choice of whether to carry over at all.

![]()
This is where you establish the maximum amount of Time-Off that an employee is allowed to have at any given time for a particular level.
--NOTE--
- If there is no limit to what may am employee may earn, there can be no limit to what an employee may have.
- If there is no limit to what an employee may carry over, there can be no limit to what the employee may have.
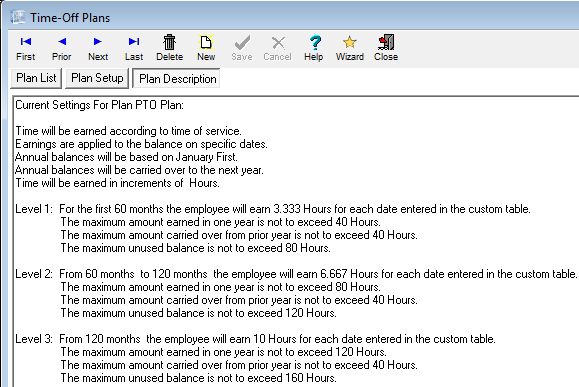
In the example below, the plan has 3 levels. Each level must be read with the understanding of when Time-Off accrues. This example plan accrues Time-Off on Custom Dates. Because of this...
Read level one this way... If when the next Custom Date occurs an employee has between zero and 60 months of service, the employee will earn 3.333 hours of Time-Off on that Custom Date.
Read level two this way... If when the next Custom Date occurs an employee has between 60 months and 120 months of service, the employee will earn 6.667 hours pf Time-Off on that Custom Date.
Read level three this way... If when the next Custom Date occurs an employee has between 120 months and 9,999 months of service, the employee will earn 10 hours on that Custom Date.

After you save your plan, click Plan Description in the upper left. Below, you have an example of how our plan appears in plain text. Please review the illustration and then read the warning below.
--IMPORTANT-- If you create the Time-Off plan after the date when Time-Off should have accrued to an employee or...
if the plan doesn't take effect until after the date when Time-Off should have accrued to an employee or...
If you assigned the Time-Off plan to someone after you already ran it for the date when Time-Off should have accrued to that employee or...
If the employee did not exist in the database on the date when Time-Off accrued...
...the employee will not earn Time-Off until the next date when Time-Off should accrue.
You can resolve this by entering an Initial Deposit effective last date when Time-Off should have accrued to the employee or you can re-run your Time-Off accruals forward from last date when Time-Off should have accrued.
Comments
Article is closed for comments.